
 DJI Ronin-S In-Depth Series – Part 1 – Setup
At CES 2018 in January, DJI announced a brand-new gimbal for professional videographers and vloggers, the DJI Ronin-S. Made for DSLR and mirrorless cameras, the Ronin-S provides three-axis stabilisation for stunning shake-free videos and images.
Following its announcement, DJI gave professionals from creative industries the opportunity to try out the gimbal and put it through its paces. The feedback was then put directly into the gimbal, resulting in a highly functional gimbal, shaped by its target audience.
In this post, we will go through the set up of this new gimbal, taking you from unboxing, right through to the controls.
Keep reading to find out more on the Ronin-S and see how to set it up to get the best results.
DJI Ronin-S In-Depth Series – Part 1 – Setup
At CES 2018 in January, DJI announced a brand-new gimbal for professional videographers and vloggers, the DJI Ronin-S. Made for DSLR and mirrorless cameras, the Ronin-S provides three-axis stabilisation for stunning shake-free videos and images.
Following its announcement, DJI gave professionals from creative industries the opportunity to try out the gimbal and put it through its paces. The feedback was then put directly into the gimbal, resulting in a highly functional gimbal, shaped by its target audience.
In this post, we will go through the set up of this new gimbal, taking you from unboxing, right through to the controls.
Keep reading to find out more on the Ronin-S and see how to set it up to get the best results.
 DJI Ronin-S
Specifications
Let’s start by taking a look at the specifications:Peripheral
Camera Tray Dimensions |
Maximum depth from the center of gravity on the camera base plate: 98 mm
Maximum height measured from the top of the camera base plate: 150 mm
Maximum width: 205 mm
|
Accessory Port |
Mechanical: 1/4"-20, 3/8"-16 Mounting Hole, M4 Mounting Hole
Electrical: 12V/2A Power Accessory Port, Camera Control Port, 8-pin Port |
Input Power |
Model: RB1-2400mAh-14.4V
Type: 18650 LiPo
Capacity: 2400 mAh
Energy: 34.56 Wh |
Connections |
Bluetooth 4.0, USB-C |
DJI Assistant 2 Requirements |
Windows 7 or above
Mac OS X 10.11 or above |
Ronin App Requirements |
iOS 9.0 or above
Android 4.4 or above |
Working Performance
Load Weight (Reference Value) |
3.6 kg (Handheld) |
Angular Vibration Range |
±0.02° |
Maximum Controlled Rotation Speed |
Pan axis: 360°/s
Tilt axis: 360°/s
Roll axis: 360°/s |
Mechanical Endpoint Range |
Pan axis: 360° continuous rotation
Tilt axis: +185° to -95°
Roll axis: 360° continuous rotation |
Controlled Rotation Range |
Pan axis: 360° continuous rotation
Tilt axis: +135° to -90° (Upright Mode, +90° to -135° (Underslung and Flashlight Mode)
Roll axis: ±30°, 360° continuous rotation (Roll 360 mode) |
Mechanical & Electrical Characteristics
Working Current |
Static current: ≈0.16 A |
Bluetooth Operating Frequency |
2.4 to 2.48 GHz |
Bluetooth Transmitter Power |
0 dBm |
Operating Temperature |
-4° to 113° F (-20°C to 45°C) |
Weight |
Approx. 3.3 lb (gimbal only), Approx. 4.1 lb (gimbal and grip included) |
Dimensions |
Approx. 202 x 185 x 486 mm |
What’s in the Box?
Next, let's take a look at what's included with the DJI Ronin-S.
 DJI Ronin-S
|
|
 DJI Ronin-S Box
The Ronin-S package also includes DJI's Focus Wheel, a simple to use tool for focussing your camera. Currently, compatibility is limited to a select few cameras, however, we're hoping this is expanded with further firmware updates.
The other key element included with the Ronin-S is the extended grip which can also be used as a tripod. This allows you either hold the gimbal comfortably with two hands or set it down for a stationary shot/between takes.
DJI Ronin-S Box
The Ronin-S package also includes DJI's Focus Wheel, a simple to use tool for focussing your camera. Currently, compatibility is limited to a select few cameras, however, we're hoping this is expanded with further firmware updates.
The other key element included with the Ronin-S is the extended grip which can also be used as a tripod. This allows you either hold the gimbal comfortably with two hands or set it down for a stationary shot/between takes.
 DJI Ronin-S Tripod
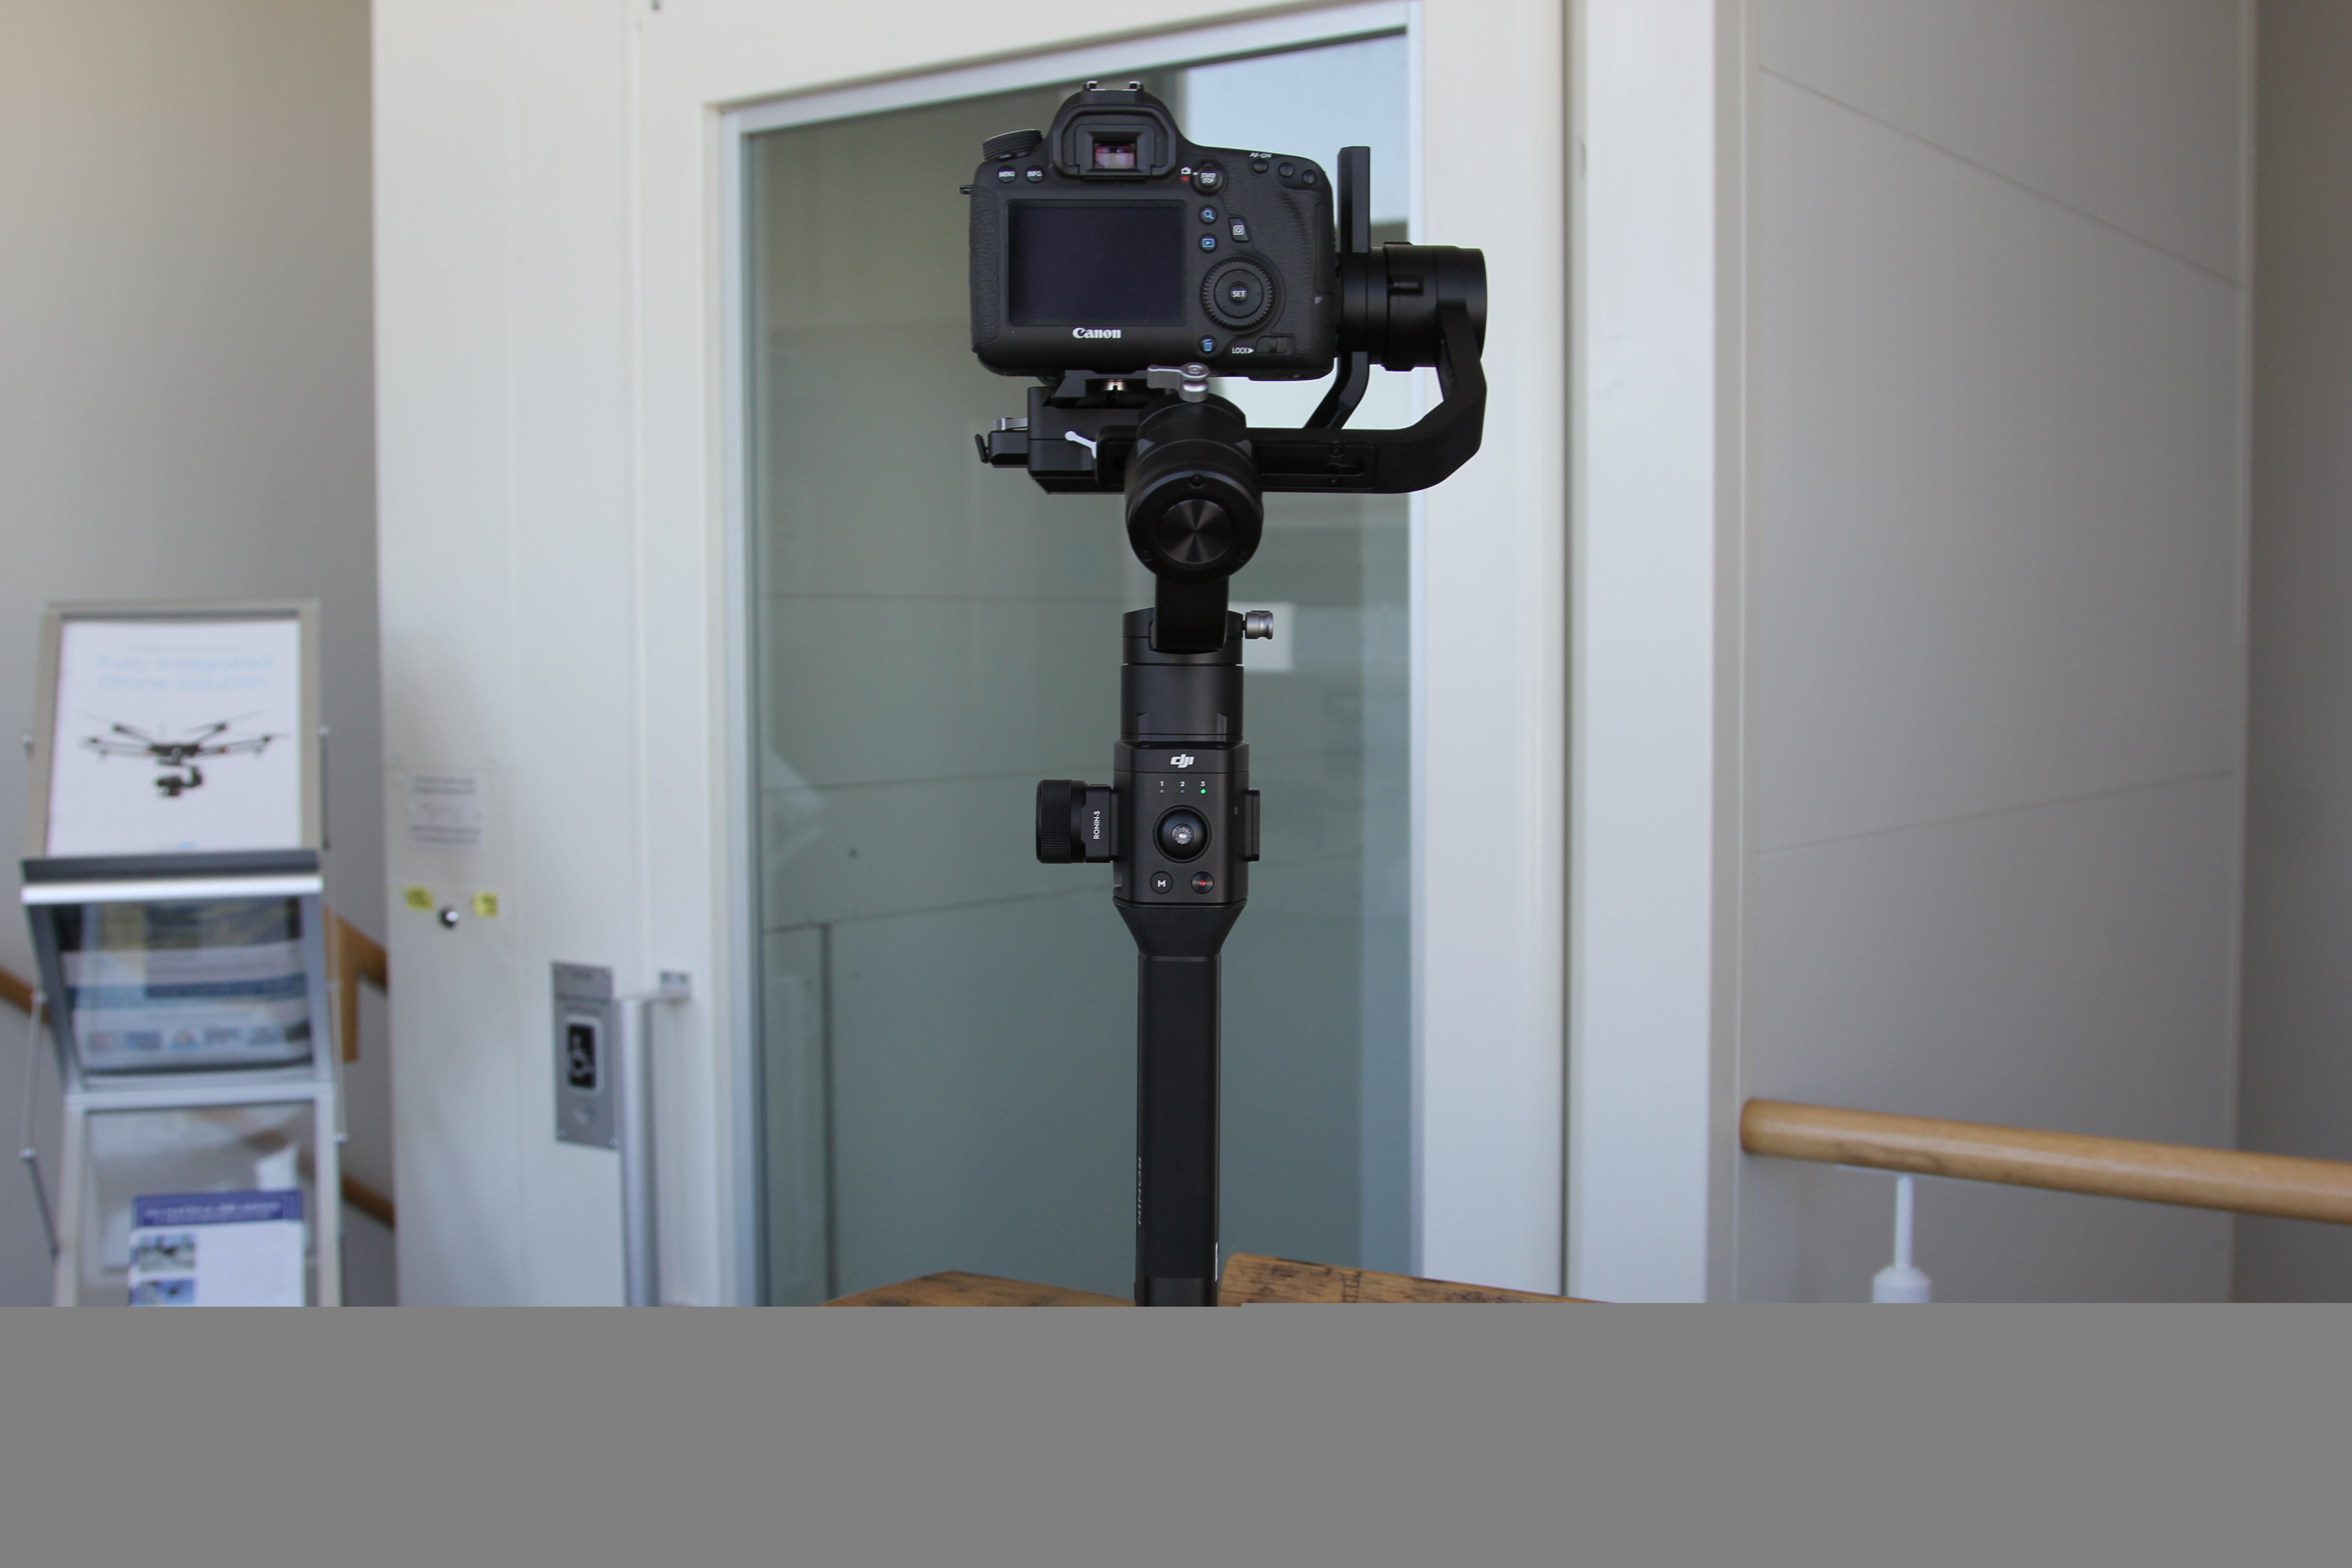
Ronin-S Layout
The Ronin-S is made up of a handle/battery and the gimbal itself. Check out the below image which highlights each component of the Ronin-S: As you can see in the above image, the Ronin-S has an elevated platform for your DSLR and mirrorless camera, meaning, unlike some similar gimbals, the motors won't come into the frame in use. Additionally, larger payloads are also compatible without issue.
We'll go over the controls on the Ronin-S following the set up below.
As you can see in the above image, the Ronin-S has an elevated platform for your DSLR and mirrorless camera, meaning, unlike some similar gimbals, the motors won't come into the frame in use. Additionally, larger payloads are also compatible without issue.
We'll go over the controls on the Ronin-S following the set up below.
Ronin-S Setup
Properly setting up your gimbal will ensure you achieve the maximum battery life and maintain absolute control. When you receive your Ronin-S, head to the App Store or Google Play and download the DJI Ronin app for the Ronin-S and Ronin 2. You're then ready to assemble your gimbal.Assembling your Ronin-S
Start by connecting the extended grip to the standard grip/battery. Then attach the grip to the gimbal using the dovetail mount and lock it in place. Once the gimbal is assembled, set the camera up for standard use (SD card, lens removed etc.), then attach the camera mounting plate to your camera as you would with a tripod and add the lens support to the camera's lens. You can then mount the camera to the gimbal and attach any applicable connections that are compatible to your individual camera. Check out the below video for an overview of the process: Please Note - Do not power on the Ronin-S until the camera is mounted and balanced. This may cause damage to the motors. A full list of camera compatibility is available in the downloads section of the Ronin-S page here.Balancing the Camera
Once your camera and accessories are mounted, you will have to balance your Ronin-S. Follow the below steps to ensure proper balancing. Step 1 - First, turn the camera to face upwards and let go. Loosen the knob and adjust the balance of the camera until it's level. Then tighten the knob again. Step 2 - Hold the gimbal vertically and move the camera mounting plate until the camera stands straight. Tighten the lock once the camera is level. Step 3 - Hold the camera vertically again and check its roll axis balance. Adjust the roll axis knob and move until the camera will stay upright. Step 4 - Move the gimbal to an angle and see where the camera moves to face. Adjust the knob on the pan axis and move until the camera stays in place. If you add or remove anything from the camera, check the balance is right before powering on. Balancing your camera will maximise the battery life of your Ronin-S. Please Note - Some larger camera and lens setups will require counterweights.Charging your Ronin
The Ronin-S features a built-in 2400 mAh battery within its grip. The battery is capable of powering the Ronin for up to 12 hours if properly utilised. You should fully charge your Ronin-S before your first use. The battery is charged through the USB-C port on the grip and will take around two and a half hours. Ronin-S on Charge
Continuous operation is possible if using the Ronin-S with a power bank or portable charger.
Ronin-S on Charge
Continuous operation is possible if using the Ronin-S with a power bank or portable charger.
Activating your Ronin
Once you've set up the physical gimbal, you will have to activate your Ronin-S. Launch the Ronin app and log into your DJI account. Next, power on the gimbal by tapping then holding the power button. Turn on the Bluetooth on phone and search for the Ronin-S. You may have to input a password for the device which will be '12345678'. Go into the app again and follow the on-screen instructions to activate the gimbal. Once complete, double tap the power button to engage the motors.Tuning your Ronin
The final stage we recommend in setting up your Ronin-S is to complete an auto tune with your gimbal. This can be done through the Ronin app or on the gimbal. Select the Motor Parameters in the settings in the app, then tap Auto Tune. Ronin App - Auto Tune
Alternatively, hold the trigger and mode buttons on the Ronin for three seconds to manually begin the tuning process. The profile indicator will then blink and turn green once complete.
Following these steps, you're ready to start using your DJI Ronin-S.
Ronin App - Auto Tune
Alternatively, hold the trigger and mode buttons on the Ronin for three seconds to manually begin the tuning process. The profile indicator will then blink and turn green once complete.
Following these steps, you're ready to start using your DJI Ronin-S.
Ronin-S Settings
In the DJI Ronin app, you can view and control the settings for the Ronin-S as well as the access the various shooting modes etc. In this section, we will look at the settings you can control on the Ronin mainly within the Configuration section of the menu. We will look at the options available in Create in the second part of the series. DJI Ronin Settings
On the home menu shown above, you can connect to your Ronin-S, check the status and view the battery levels.
DJI Ronin Settings
On the home menu shown above, you can connect to your Ronin-S, check the status and view the battery levels.
Configuration
The Configuration menu lets you control various aspects of the Ronin-S's settings. Settings are broken down into the sections shown in the menu below: DJI Ronin Settings - Configuration
In this menu, you can choose between three user profiles, setting individual settings to suit different shots.
DJI Ronin Settings - Configuration
In this menu, you can choose between three user profiles, setting individual settings to suit different shots.
Motor Parameters
 DJI Ronin Control Moto Parameters
This menu allows you to complete the tuning function we discussed above as well as set specific motor parameter.
Following the tuning, the motor details will be set to the appropriate level for your gimbal and payload set up.
The motor parameters are broken down into the following areas:
Stiffness - Motor stiffness allows you to choose the power supplied by each motor for balance and weight. You should ensure extra margin is left for each setting for a guaranteed stability.
Strength - DJI recommend leaving this setting as the default. The strength setting allows you to minimize attitude error by increasing the strength.
Filter - The filter setting can help reduce high-frequency vibrations of the Ronin-S. This is done by lowering the setting to reduce the numbness of the motor.
Control - This setting can be used to assist with low-frequency vibrations. If vibrations are visible, increasing and decreasing the control can help optimise the settings.
These settings should only be changed once you know how to control them properly. Until this point, the settings chosen in tuning should provide the best results fpr your setup.
DJI Ronin Control Moto Parameters
This menu allows you to complete the tuning function we discussed above as well as set specific motor parameter.
Following the tuning, the motor details will be set to the appropriate level for your gimbal and payload set up.
The motor parameters are broken down into the following areas:
Stiffness - Motor stiffness allows you to choose the power supplied by each motor for balance and weight. You should ensure extra margin is left for each setting for a guaranteed stability.
Strength - DJI recommend leaving this setting as the default. The strength setting allows you to minimize attitude error by increasing the strength.
Filter - The filter setting can help reduce high-frequency vibrations of the Ronin-S. This is done by lowering the setting to reduce the numbness of the motor.
Control - This setting can be used to assist with low-frequency vibrations. If vibrations are visible, increasing and decreasing the control can help optimise the settings.
These settings should only be changed once you know how to control them properly. Until this point, the settings chosen in tuning should provide the best results fpr your setup.
SmoothTrack
 DJI Ronin Control SmoothTrack Settings
Enabling SmoothTrack will allow the Ronin-S to respond to the user's movements without manual operation. Settings can be changed for each axis with the options of low, medium, high or custom settings in any of the following:
Speed - Choose how quickly the Ronin will react.
Deadband - Choose how much movement the Ronin will ignore.
Sensitivity - Choose how quickly the Ronin will react to movement.
You can also choose whether the Push feature is active. This feature allows you to manually move the gimbal by hand.
DJI Ronin Control SmoothTrack Settings
Enabling SmoothTrack will allow the Ronin-S to respond to the user's movements without manual operation. Settings can be changed for each axis with the options of low, medium, high or custom settings in any of the following:
Speed - Choose how quickly the Ronin will react.
Deadband - Choose how much movement the Ronin will ignore.
Sensitivity - Choose how quickly the Ronin will react to movement.
You can also choose whether the Push feature is active. This feature allows you to manually move the gimbal by hand.
Remote Control
These settings apply to the joystick control of the Ronin-S. Settings are broken down into Motion and Channels.Motion
 DJI Ronin Control Settings - Motion
In Motion, you can control settings for the pan, tilt and roll. Like with the SmoothTrack setting, you can set the Deadpan and Max Speed, however, there are also options to set the Smoothing and Endpoint.
Deadpan - When in the high option, greater stick movement will be required to move the gimbal.
Max Speed - This option controls the speed of the joysticks response.
Smoothing - When the value is increased, the Ronin-S will slow down for a smooth shot. When at 0, the Ronin-S will abruptly stop.
Endpoint - In the endpoint setting, you can limit the rotation of the gimbal as required. If a complete rotation is required, set the value of left and right to 180.
DJI Ronin Control Settings - Motion
In Motion, you can control settings for the pan, tilt and roll. Like with the SmoothTrack setting, you can set the Deadpan and Max Speed, however, there are also options to set the Smoothing and Endpoint.
Deadpan - When in the high option, greater stick movement will be required to move the gimbal.
Max Speed - This option controls the speed of the joysticks response.
Smoothing - When the value is increased, the Ronin-S will slow down for a smooth shot. When at 0, the Ronin-S will abruptly stop.
Endpoint - In the endpoint setting, you can limit the rotation of the gimbal as required. If a complete rotation is required, set the value of left and right to 180.
Channels
 DJI Ronin Control Settings - Channels
In this section, you can change how the Ronin-S operates when controlled, switching between the pan, tilt and roll.
If using the built-in joystick, you can only control the CH1 and CH3 whereas, if using a third-party controller, all areas can be customised.
DJI Ronin Control Settings - Channels
In this section, you can change how the Ronin-S operates when controlled, switching between the pan, tilt and roll.
If using the built-in joystick, you can only control the CH1 and CH3 whereas, if using a third-party controller, all areas can be customised.
Settings
In this mode, you can set various basic settings for the Ronin-S.General
 DJI Ronin Settings - General
In General, you can choose between handheld and car mount, change the user profile and pause the motors.
DJI Ronin Settings - General
In General, you can choose between handheld and car mount, change the user profile and pause the motors.
More
 DJI Ronin Settings - More
In More, you can reset the gimbal settings, complete a balance test and calibrate the system. The calibration is advised if you notice a drift with the Ronin-S.
DJI Ronin Settings - More
In More, you can reset the gimbal settings, complete a balance test and calibrate the system. The calibration is advised if you notice a drift with the Ronin-S.
DJI Ronin-S Buttons and Controls
The Ronin-S features a simple to use interface with only a few buttons and controls, keeping the operation straightforward and easy to use. Ronin-S Controls
Buttons and Controls
There are five buttons for the basic control of the Ronin-S. Some buttons will be similar to previous gimbals from the DJI Ronin and Osmo ranges.Power Button
- To power on your Ronin-S, tap and hold the power button for one to two seconds
- To turn off your Ronin, hold the power button for two seconds
- Double tap to pause the motors and double tap again to re-engage
M Button
- Tap once to change between the user modes
- Tap and hold to enter the Ronin's Sports Mode
- Tap six times to restore the user profiles and Bluetooth password to the default
Trigger
- Press and hold to use the Lock Mode
- Tap twice to recentre the Ronin
- Press three times to turn the camera 180°
- Tap four times then hold to calibrate the joystick. Move the joystick in all directions then tap four times and hold to complete the calibration
Joystick
The joystick is programmable to suit the individual user within the 'Control' option of the settings. As standard, the joystick will operate as follows:- Up/down - move the tilt axis
- Left/right - move the pan axis
Shutter Button
- Tap to start/stop recording
- Press and hold to take a photo
- Press half way to auto focus the camera (if available on your camera)
Focus Wheel
The Focus Wheel allows you to control the focus of a compatible camera. Ronin-S - Focus Wheel
Focus Wheel
- Rotate to control the focus on the camera
CAN/S-Bus Switch
- CAN - switch the CAN position to connect to the DJI Pro Wireless Receiver
- S-BUS - switch to S-BUS when connected to a third-party controller
Multifunction Button
- Tap once for a-b-point calibration
- Click twice for travel calibration
- Press and hold to flip the control connection
Status Indicator
The indicator will show the status of the Focus Wheel as per the below:- Red - double blinking - firmware update required
- Red - blinking - disconnected
- Yellow - solid - external focus motor detected without travel calibration
- Yellow - blinking - external focus motor is being travel calibrated
- Green - solid - connected
- Green - blinking - external focus motor's a-point is set
- Green double blinking - external focus motor's a-b-point is set
CAN Port
- Used to connect a wireless receiver
8-Pin Contact
- Power and transmit control for the Focus Wheel
Ronin-S Compatibility
The Ronin-S can be used with a number of cameras and accessories. Check out the current integration below.Camera Compatibility
The Ronin-S supports a range of DSLR and mirrorless cameras from a number of manufacturers. These include Nikon, Canon, Panasonic and more. Currently, Panasonic offers the greatest levels of compatibility with their GH5 and GH5S models working with all aspects of the Ronin-S. However, different cameras have varying levels of connection. DJI are currently in the process of speaking to camera manufacturers about integration, so we should see further development. We have tested the Ronin-S with a Canon 6D which features start/stop recording which integrates well within a workflow. Head to the downloads section of our Ronin-S page to see an up to date camera compatibility list.Accessories
The Ronin-S is currently compatible with the DJI Master Wheels and Force Pro systems, giving users additional control over the Ronin-S. Master Wheels - This wheel-based system allows cinematographers and high-end filmmakers control over the Ronin-S through a combination of precision sensors and advanced algorithms. Force Pro - This control system synchronises with a gimbal to mimic the smallest movements used to capture minute detail. In addition to these two controllers, a wide range of accessories from DJI and other manufacturers is expected to be released shortly. With the current power and connectivity options, it's likely the Ronin-S will have a huge amount of accessories including monitors, mounts etc. available in the coming months.DJI Ronin-S Summary
The Ronin-S is an incredible tool for filmmakers and vloggers who use a DSLR or mirrorless camera. The setup process is remarkably quick, especially when compared to similar gimbals on the market. Take the time to learn the setup process, especially the settings and modes and you will achieve some incredible results. In our next instalment of the Ronin-S in-depth series, we will provide an overview of the shooting modes included on the Ronin-S to help you get the most out of your gimbal.To discuss any information from the above post or any DJI or Freefly product, please give one of our team a call on 0191 296 1024 or email us at info@heliguy.com.
Keep checking back to Heliguy’s Insider Blog for more announcements, insights into drones and, of course, the latest news from the drone industry.


Leave a comment