
 Coding with the Ryze Tello
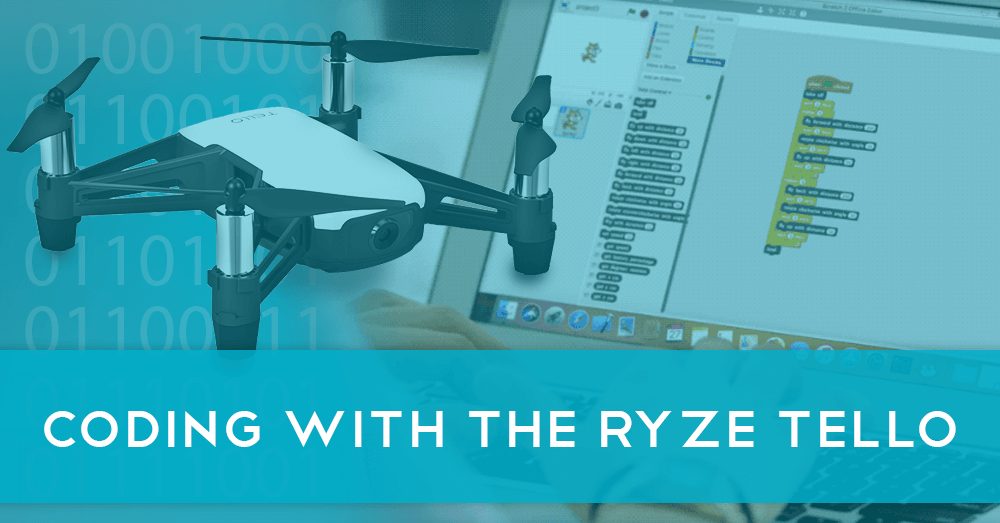
The new Tello drone from Ryze is a one of a kind, toy drone that puts the fun back into drone flying. It’s packed with features unlike any other at this low price point. One of the most notable is its compatibility with the MIT-developed coding software, Scratch, that allows users to control the Tello with a computer and input pre-planned flights.
In this post, we will be walking you through how to use Scratch with the Tello and showing you some examples of this unique feature in action.
Keep reading for more on Scratch coding with the Tello.
Coding with the Ryze Tello
The new Tello drone from Ryze is a one of a kind, toy drone that puts the fun back into drone flying. It’s packed with features unlike any other at this low price point. One of the most notable is its compatibility with the MIT-developed coding software, Scratch, that allows users to control the Tello with a computer and input pre-planned flights.
In this post, we will be walking you through how to use Scratch with the Tello and showing you some examples of this unique feature in action.
Keep reading for more on Scratch coding with the Tello.
Scratch and the Tello
Scratch is a programming language designed to teach children and teenagers the basics of coding in a fun and interactive way. It allows users to create games, stories and animations to develop their skills. Although targeted at kids, Scratch is a great way for anyone to take their first steps into coding, especially when combined with the Tello. In the case of the Tello, you have two options of control; create a pre-planned mission with actions that you can start with the touch of a button or manually control the Tello with a device in real-time. This is a fun and unique feature for all Tello pilots that can also be used as an educational tool to build your skills in coding. Tello in Flight
How to Use Scratch
Once you’ve got to grips with flying your Tello and using all of the different intelligent modes, it’s time to check out the Scratch coding functionality. We will walk you through the process of using Scratch with your Tello. First off, we will look at the tools required for the Tello.Downloading Software
There are several different components required to use Scratch with your Tello. We will be using a Windows device; however, we will also note any differences if you’re using Apple. First off, you need to start by downloading the Scratch Offline Editor from the Scratch website here. Download Scratch
Choose the correct version for the device you’re using.
If using a Mac, you will also have to download Adobe AIR as seen below:
Download Scratch
Choose the correct version for the device you’re using.
If using a Mac, you will also have to download Adobe AIR as seen below:
 Download Adobe AIR
Next, you should download Node.js, a supporting program for Scratch. Again, choose the appropriate version for your device.
We selected the version recommended by Node which includes all of the required features to operate Scratch.
Download Adobe AIR
Next, you should download Node.js, a supporting program for Scratch. Again, choose the appropriate version for your device.
We selected the version recommended by Node which includes all of the required features to operate Scratch.
 Download Node
Finally, you will need to download a zip file from Ryze Robotics which includes the pre-set actions and allows you to communicate with the Tello.
You will need to ensure the following files are downloaded:
Download Node
Finally, you will need to download a zip file from Ryze Robotics which includes the pre-set actions and allows you to communicate with the Tello.
You will need to ensure the following files are downloaded:
- Tello.js
- Tello.s2e
Scratch Setup
Once you’ve downloaded all of the required programs and you’re ready to begin coding your Tello, open up Scratch. Its interface will be displayed as the below: Scratch Interface
Before you can start using Scratch, you need to install the blocks you have downloaded as part of the earlier stage.
Hold down the 'Shift' key and click on 'File, then select 'Import Experimental HTTP Extension'.
In the next menu select the 'Tello.s2e' file type.
Once selected, under the 'More Blocks' tag, options specifically for the Tello will appear as seen below:
Scratch Interface
Before you can start using Scratch, you need to install the blocks you have downloaded as part of the earlier stage.
Hold down the 'Shift' key and click on 'File, then select 'Import Experimental HTTP Extension'.
In the next menu select the 'Tello.s2e' file type.
Once selected, under the 'More Blocks' tag, options specifically for the Tello will appear as seen below:
 Scratch - More Blocks
The next stage to set the Tello up with Scratch is getting your computer to run the script you have downloaded.
First off, press the Windows and 'r' simultaneous to open up a run window. In the window, type in 'cmd.exe' as shown below:
Scratch - More Blocks
The next stage to set the Tello up with Scratch is getting your computer to run the script you have downloaded.
First off, press the Windows and 'r' simultaneous to open up a run window. In the window, type in 'cmd.exe' as shown below:
 Run Box
You will then be presented with the below screen:
Run Box
You will then be presented with the below screen:
 Windows
Next, open the Windows File Explorer and locate the files you have download. This will likely be in your downloads file or desktop depending on where you save your documents.
Copy the address from the path bar as shown below:
Windows
Next, open the Windows File Explorer and locate the files you have download. This will likely be in your downloads file or desktop depending on where you save your documents.
Copy the address from the path bar as shown below:
 Windows
You may also have to authorise actions throughout this process. This process will be similar when using an Apple product but may differ with some steps.
Windows
You may also have to authorise actions throughout this process. This process will be similar when using an Apple product but may differ with some steps.
Connect the Tello
The final stage in setting up the Tello with Scratch is to allow a connection to the Tello and connect via Wi-Fi to the drone. Turn on the Tello and enter your Wi-Fi settings. The Tello should appear as an option for you to select. Tello Wi-Fi
Once you have completed each of these stages, the indicator on Scratch under the 'Tello Control' will turn from red to green, signifying it is connected.
You're then ready to fly the Tello using Scratch.
Please note, every time Scratch is closed, you will need to run the script, add the blocks and connect the Tello to Scratch again.
Tello Wi-Fi
Once you have completed each of these stages, the indicator on Scratch under the 'Tello Control' will turn from red to green, signifying it is connected.
You're then ready to fly the Tello using Scratch.
Please note, every time Scratch is closed, you will need to run the script, add the blocks and connect the Tello to Scratch again.
Using Scratch
Once you have everything installed and setup, you can begin using Scratch to control the Tello and create pre-planned flight. In this section, we will be looking at the Tello controls used for flights and showing you four examples.Scratch Controls
When using Scratch with your Tello, there are three main categories of blocks you will need to use, dependent on your type of flight. Event - This is the block used as a trigger for something to happen. Flights are usually set to begin when the green flag is selected or space bar pressed. More Blocks - This section is the specific controls put in for the Tello such as take off, fly forwards and flip. Controls - This section allows you to add in instructions such as the duration of a move or repeat a move etc. Sounds - We've added in this extra category for its entertainment value, you can input different sounds into your flight. Sounds are played on the device used to control the Tello, in our case, the Windows laptop. In order to input the controls, simply drag a block into the right-hand section of scratch. You should start with an event, then input your desired instruction for the Tello. Always assign the take off and landing before beginning any flight. We also recommend you create an option to land the drone when a button is selected. For this, we chose the space bar on all flights. This will give you the option to end the flight at any time, a useful option if an error occurs.Basic Planned-Flight
For the first flight, we have planned a basic flight for the Tello using Scratch. It's recommended for your for your first flight, you create a similar flight in order to get used to the basic controls.Scratch Controls
 Basic Flight Controls
We used the green flag to launch the Tello and start the set routine, then flew forwards, backwards and landed. When setting the duration, we recommend using at least five seconds as the Tello needs adequate time to perform the actions you have included.
Basic Flight Controls
We used the green flag to launch the Tello and start the set routine, then flew forwards, backwards and landed. When setting the duration, we recommend using at least five seconds as the Tello needs adequate time to perform the actions you have included.
Video Example
Now the controls have been input, check them out in action in the video below: https://www.youtube.com/watch?v=BdtMweiKFosAdvanced Planned-Flight 1
Once you've got used to basic flights as shown below, try moving on to more advanced flights with complex routines. You can incorporate flips, more difficult manoeuvres and incorporate sounds.Scratch Controls
 Advanced Flight Controls
Like the basic flight, we started our flight with assigning the Tello take off to the green flag in order to begin the planned routine. We then added more advanced controls to the flight.
Advanced Flight Controls
Like the basic flight, we started our flight with assigning the Tello take off to the green flag in order to begin the planned routine. We then added more advanced controls to the flight.
Video Example
Check out the example video of the more advanced flight: https://www.youtube.com/watch?v=keTh03BQB1sAdvanced Planned-Flight 2
For this flight, we incorporated sound into the flight to show off this feature.Scratch Controls
 Advanced Planned-Flight 2
Video Example
Check out the example video below. Make sure your sound is on to hear this interesting feature: https://www.youtube.com/watch?v=IIugUu81LEAIn Air Control
Once you've mastered the advanced flights, try the final option; in air control of the Tello. This is more complex as you have to assign different actions to buttons on your mouse and keyboard and maintain real-time control over the Tello. The layout will be different to pre-planned flights as two blocks are put together to stand alone with a trigger and action. In Air Flight Controls
Once we input the controls, we were able to take off the drone and control its movements using the keyboard.
In Air Flight Controls
Once we input the controls, we were able to take off the drone and control its movements using the keyboard.
Video Example
Check out the video of us controlling the Tello in real-time using Scratch. https://www.youtube.com/watch?v=2uPKENydcJw Please note, we had a dip in the performance and responsiveness of the Tello when battery levels were low. Make sure you monitor the Tello closely when the charge is depleted and stop using Scratch to charge the drone if acts outside your command.Summary
The option to use Scratch with the Tello is a great addition to the drone. The setup seems daunting at first but once you use the process a couple of times, it becomes second nature. It will be interesting to see if this is developed in the future by Ryze to include options like video record, take a picture or the intelligent flight modes. This would definitely improve the user experience. You can see that the use of Scratch with the Tello is primarily aimed at younger generations but it's still fun to use and a great educational tool to learn the basics of coding.To discuss any information from the above post or any DJI or Freefly product, please give one of our team a call on 0191 296 1024 or email us at info@heliguy.com.
Keep checking back to Heliguy’s Insider Blog for more announcements, insights into drones and, of course, the latest news from the drone industry.

Leave a comment